Setup your virtual machine in 10 easy steps!
Hello Ubuntu and Kubuntu people :)
In this tutorial i will show you how to install and set up your VirtualBox in Ubuntu or Kubuntu.

I need to mention that like your virtual OS you can install also Windows so you can use some programs you are missing on Ubuntu/Kubuntu but i will not recommend to use it for gaming because it is very CPU consuming.
Lets begin.
Step 1.
Like always we can install VirtualBox from Terminal/Konsole or with some GUI package manager.
If you are using command line then type:
sudo apt-get install virtualbox-ose
Input your password and hit enter. The installation will start immediately.

If you do not want to type then go to Synaptic/Ubuntu Software Center/Adept/KPackageKit or something fifth and simply type Virtualbox, check it and press install and there you are.
Step 2.
Start your VirtualBox. Go to your programs and find it.

Step 3.
Now we need to create our virtual machine and it's characteristics. Just imagine that you are assembling your new PC configuration :)
Click New button.

As you can see we have started our own Virtual Machine Wizard! He will guide us safely to the end of this process! In this moment i want to tell you that you can NOT create any problem on your OS with this procedure, at least it never happened to me :)
Step 4.
Hit next and you will see following window.

Name your new machine how you prefer. I put Testing OS. Then choose your Operating System. You will see that in the dropping menu there are Linux, Windows, FreeBSD, Solaris and some other OS. In this tutorial i'll pick Linux but you can pick whatever you need to install. After this pick Linux distribution and in this case i picked Ubuntu 32bit version. There are others as well.

Click next.
Step 5.
Now we have to add some RAM memory to our Virtual machine (VM). I have 4GB of RAM and it is not a problem for me to "give" 1GB to my VM. Be careful with this because you must have on your mind that your real OS also needs some RAM memory. In the case that you do not have SWAP memory try not to share to much because you might crush your system. You see that minimum is about 384 but i say give at least 512MB just in case.

When you finish with this hit Next.
Step 6.
OK. We are doing great so far. Now we need to create our Virtual Hard Disc Drive (HDD). For this we also have wizard.

Hit Next and we can start.
You have two options - Dynamic Expanding Storage and Fixed-size storage. The first will adjust to your space demands and in the case of the second one, like the name says, you will have to predefine space on your virtual HDD.

Hit Next.
Now we need to determine our virtual HDD capacity and to place it somewhere on our real HDD. Click little folder icon.

Give some name to your HDD. I gave mine HDD name HDD :)

Click Save. In size section i put 4GB but i think that you can put 2GB. In any case we put dynamic partitioning so if it's necessary it will expand.

Click Next.
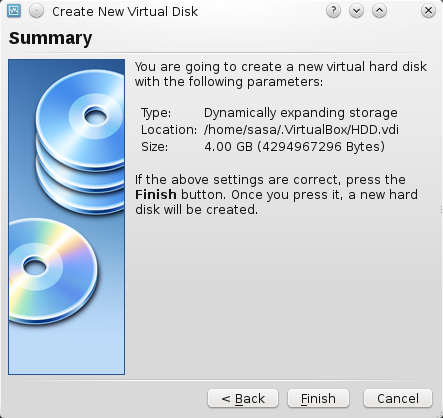
Click Finish. Now we have made basic setup for our VM!
Step 7.
As you can see we have generally created our VM! It was simple so far and it will stay like that. We still need to make some minor adjustments.
Click Settings button on the top of the screen.

You will see following screen. In the settings you can manage your VM in details but for now we will modify just two more thing. One is CD/DVD and other one is virtual graphic card.

Go to Display tab.
Step 8.
In the display tab we will give our virtual graphic card a little bit more power.

I read that it is enough if you give your virtual graphic card just 16MB but since i have 256MB graphic card it is not a problem to put some more power so i will put 32MB. You can put here whatever you like but try not to make it under 16Mb. Also notice that if you put to much power you can experience your real OS slowdown.
Go to CD/DVD-ROM tab

Step 9.
In CD/DVD-ROM tab you will have to add your .iso image Ubuntu CD so we can use it later.

In the case that you have previously burnt you image file on CD/DVD and you want to start Live CD from that place you can check first option "Host CD/DVD drive".
Click OK.
Step 10.
And that is it. All we need to do now is to click START button. After that you may install your first virtual OS.
It is important to say that VirtualBox works great on Windows, Linux, Solaris and some other platforms. In the case that you are using Windows and you want to try Ubuntu or some other Linux you can also use this tutorial.
If you want to learn how to install Ubuntu click here.
If you want to learn how to install Kubuntu click here.
I hope you will find this tutorial useful. If you like it please rate it and leave a comment.
Thank you and enjoy,

Category: Programs


it's very helpfull
Thank you! :)
OMG, TY for ur tutorial! It was very helpful to me! I wanted that code but didn't know... Now I can to download the virtualbox, my favorite program to "emulate" OS! Greetings from Brazil! ;)
No problem. Happy to help! ;)
it is good and it will help me a lot tank you !!!!!
You are welcome ;)