
For many times i was reading about Dropbox and the whole bunch of similar services and i just didn't understand why it is so important!? I have younger brother. He is web designer. I also have flat mate he is expert for internet marketing and product retailing, writer, reader and more. Three of us quite often work together on some internal internet projects. Many times we exchange dozens of files between each others. Well i could say that we are stupid we never even read anything about Dropbox and similar services.
What is so fascinating? :)
For me the best thing about Dropbox is a fact that once upon installation is finished, it creates a folder, named Dropbox in your Home folder, and then magic starts. You just need to add file in this folder and it will be automatically uploaded to your Dropbox account. Dropbox advertise their services something like "go wherever you want your files will be close to you" which is quite correct but i think that in this story that will not be a point.

Imagine that you have five friends working on the same project - some website, scientific project, NGO project or some other activity which demands few people involvement. You need to coordinate million files all the time, million of email and chats. Well that is totally simplified with Dropbox. Now you can share one or more folders, which are inside you Dropbox folder, and then to add files directly into it. Almost at the same moment your friends will be notified that you have add something. They can look at it, change it, rename it or delete it. Good thing is also that you can start that file from Dropbox folder and upgrade it. After saving changes your friends will be notified that you have updated file!
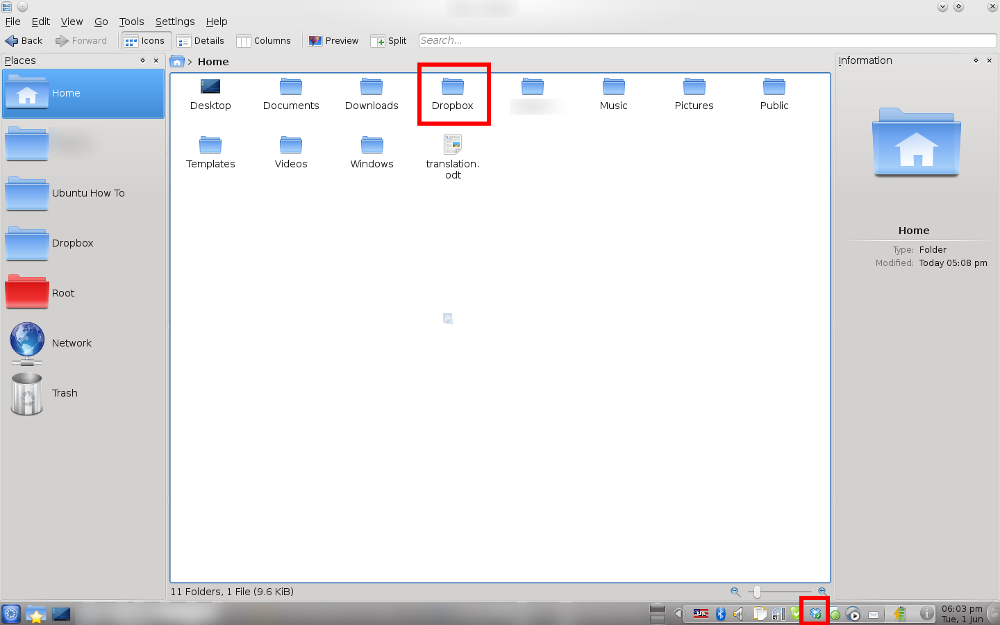

Beside my small trio with my brother and flatmate, i am using Dropbox now to coordinate this blog with other people who want to help. It is great that at the very same moment you can work and sync with the people from USA, Panama and Poland. Just great and i can say that Dropbox really changed my efficiency and time management!
Thank you for reading,
My rate: * * * * *
Purpose: File sharing and syncing
Download: You can download from official website if you click here
![Reblog this post [with Zemanta]](https://lh3.googleusercontent.com/blogger_img_proxy/AEn0k_v9OVlMvODtOzDyrpe1rTBGyM3w3d8n0vHEPNiq7dPA4wlsQaievb4Ge5elgcxRJkfw1k-XeOSnQeeeRa70yHerHCBzFtQrbaHFMfB8oiDz5a_PurYSrRmdrVxO902Xr4n8SaSdEeUktvrD4rY73BA5=s0-d)

I have found some new and fresh people to give significant support to this blog. I want to say thank you guys! The first one who contributed his tutorial is {VeTeR} from Poland. More about him you can read on his website www.veter.pl He is a designer and as such he uses a lot of different fonts. For all of you in similar situation here is a very good program with a name Opcion.
Graphic artist / designer by the time their work builds library of various objects - brushes, gradients, fonts, etc. After some time the number of these objects (eg fonts) is so large that it is hard to manipulate them in a graphics program.At this point useful become tools to manage fonts on your system.I found an interesting application -free written in Java font browser.The program works both on Windows and Linux (just installed the Java Virtual Machine).

Main Opcion window allows you to define how the text should be shown in the presentation of fonts Set Sample Text.You can also define a list of favorite fonts.

You can also browse the fonts that are not installed on your system, which are placed somewhere in a directory on disk (for example, may be in the fonts directory GIMP, which windows / linux does not see).Simply guide Opcion to font's directory and it will automatically pick all fonts from there.

You can download this program from http://opcion.sourceforge.net/ and if you speak polish you can read it directly on {VeTeR} website http://veter.pl/?p=97
In order to run this program you need to download .jar version and then to change privileges. Navigate to download directory and type:
chmod -x Opcion_v1.1.1.jar
then type:
java -jar Opcion_v1.1.1.jar
That should be it!
Thank you for reading. I hope you will like it.

Few weeks ago i have stumbled on one very interesting program for all of you creative people who like DJ-ing. I am showing you Mixxx. This is a program for mixing, like name says, which offers an incredible amount of useful tools. My brother likes this and he said it is quite useful for everybody. He is kind of DJ :) Actually he thinks that he is.
The great thing is that you can download .deb package from their website and in just a few clicks you will have it and use it. If you create something nice let me know :) I will publish it here.


I hope you are all doing good.
Enjoy,
My rate on the first sight: * * * *
Purpose: Audio mixing
Download: You can download it from official website if you click here

Today i will represent you one of my favorite programs which helps my computer to remain cool even if i watch youtube :) I say this because like you know Linux generally has a lot of problems with Flash applications which make CPU boil all the time. That is why this program is great because it is pulling out only video from Youtube so your CPU can work normally just like when you watch any movie on your computer. Your computer will remain on normal temperature so you can watch youtube videos in peace.

Minitube has standard commands so there are play, stop, pause and skip button. You have possibility to watch all videos in fullscreen mode and also in various qualities where HD is also supported.

This is very simple but yet very effective program which lets you with more comfort with youtube videos. I hope you will like it.
My rate: * * * *
Program purpose: Youtube client
Download: If you have added getdeb repository then you need to type:
sudo apt-get install minitube
If you do not have getdeb repository then add it and after that install minitube. More info about getdeb.net you can find if you click here.
![Reblog this post [with Zemanta]](https://lh3.googleusercontent.com/blogger_img_proxy/AEn0k_sxLDxkAVP8p4mMksKw3pat6SlY6PgZ-vu5KNAIJ6fVBUV1yrm9Bs_-VRp95Z15ageol0WqyWHniLgCYhBS_eK-0FyQY13aaoJ8qMsDR1qVrsDrs5f5rO9477g3MWW55YAb1sNpn8WfAXw42uVNWGtW=s0-d)
Hello dear friends,
I just installed new Kubuntu 10.04 and like most of you i need to download whole bunch of programs on the begin. Well there is a program which i always install first. The name is - Yakuake KDE terminal emulator. The name is strange but function is absolutely great. Idea is that with one click you can get your Terminal which comes from the top of the screen.

Yakuake is living in your RAM memory so access is very fast.

Why i install this among first programs after clean OS install? Well reason is very simple and that is because you just need a lot of terminal work - program installations, updates, upgrade, adding repositories etc. It is always handy to have quick access to your terminal. It is
Yakuake is great program and above all very useful one. I just love it.
My rate: * * * * *
Program purpose: Terminal emulator
Download: Install it from repositories by typing: sudo apt-get install yakuake
I just installed new Kubuntu 10.04 and like most of you i need to download whole bunch of programs on the begin. Well there is a program which i always install first. The name is - Yakuake KDE terminal emulator. The name is strange but function is absolutely great. Idea is that with one click you can get your Terminal which comes from the top of the screen.

Yakuake is living in your RAM memory so access is very fast.

Why i install this among first programs after clean OS install? Well reason is very simple and that is because you just need a lot of terminal work - program installations, updates, upgrade, adding repositories etc. It is always handy to have quick access to your terminal. It is
Yakuake is great program and above all very useful one. I just love it.
My rate: * * * * *
Program purpose: Terminal emulator
Download: Install it from repositories by typing: sudo apt-get install yakuake
Hello people,
In this post i will explain how to simply install LXDE desktop environment on your Ubuntu/Kubuntu 10.04. It is very easy and you need just about 10 minutes (depends on your internet connection) to install it.
 Like I said in one of the previous posts Canonical was interested to put LXDE under Ubuntu development. That probably resulted in putting LXDE packages into default Ubuntu and Kubuntu repositories. I will show you how to install LXDE in Ubuntu Software center but it is very easy to do the same in other package managers.
As you probably know LXDE stands for Light X11 Desktop Environment and like that it is made to be extremely resource saving desktop environment. So if you have old computer or you just want to try this is a right thing for you.
So lets begin.
Step 1.
One way to install LXDE is to open your Terminal/Konsole and type:
sudo apt-get install lxde
When installation is finished go to step 4.
Step 2.
If you do not like typing then go to Ubuntu Software Center/ Adept/ Synaptic/ KPackageKit or some other package manager and in search type LXDE.

After you input LXDE list of packages will be narrowed and you will see only one package for installation. Click install and let process go on.
Step 3.
After several minutes installation will be finished and you will see screen like the following one.

Now you need to close Ubuntu Package manager and to log out from your desktop. You are doing this on the same place when you want to shut down your system.

Step 4.
After you have logged out you will be returned to log in console. Beside standard inputting of your username and password you need to do one another thing.

After you click on your username you will see on the bottom of the screen Session tab where you need to pick your desktop environment.

Step 5.
Input your password and click log In and that is it. Once you are logged in you will see new GUI on your desktop. That is LXDE :)


Enjoy and like always if you have some questions leave a comment.
Thank you for reading.


Lot of newbies probably do not know that there is a place on the internet from which you can install program directly on your computer. Also there are a lot of you who know about this but you have never tried it before.
It is a very easy and smart system which offers latest programs and games versions. It is just one click away from you. It is also important to say that this system has some bug when you are using Firefox. I am using Google Chrome and it works just perfect.
If you want to install latest programs versions go to www.getdeb.net.

Click on the installation instructions so you can add repository in your source list.

Pay attention on notice that Kubuntu users may experience some problems and i can tell you that on Firefox there are certain problems. After you add repository in your source list all you need to do is to visit again www.getdeb.net find the program you like and click install :)
That is it. Very simple and easy program installation in Ubuntu or Kubuntu.
For gamers
There is a similar website like getdeb.net but only for gamers and games. :) If you want to see and download various games for Ubuntu and Kubuntu go to www.playdeb.net
Procedure for installation is the same like on getdeb and only thing you need to do is to add repository and click install on desirable games :)

It is also good to know that whenever you update your system you will receive latest updates for all programs you installed with playdeb and getdeb. This is good because sometimes official repositories need some time to become up-to-date.
Enjoy in video games and programs,

Pay attention on notice that Kubuntu users may experience some problems and i can tell you that on Firefox there are certain problems. After you add repository in your source list all you need to do is to visit again www.getdeb.net find the program you like and click install :)
That is it. Very simple and easy program installation in Ubuntu or Kubuntu.
For gamers
There is a similar website like getdeb.net but only for gamers and games. :) If you want to see and download various games for Ubuntu and Kubuntu go to www.playdeb.net
Procedure for installation is the same like on getdeb and only thing you need to do is to add repository and click install on desirable games :)

It is also good to know that whenever you update your system you will receive latest updates for all programs you installed with playdeb and getdeb. This is good because sometimes official repositories need some time to become up-to-date.
Enjoy in video games and programs,


I have recently found and tested a very cool plugin for Pidgin chat client which can embed your youtube, vimeo, google videos, yahoo videos and other links right into your chat session. I believe that you have been in the situation for many times that your friend send you an interesting link from Youtube and you have to click on it in order to see what's behind it. Well, that is over now since there is a very cool plugin which can solve this problem. It is available in 32bit and 64bit version. Try it and rate it now!
My rate: * * * *
Program purpose: Pidgin plugin
Download: pidgin-embeddedvideo


This will become standard practice on this pages to announce interesting and very useful programs for Ubuntu and Kubuntu.
The first one i bumped on yesterday is a TeamViewer. This is a program which simplifies desktop-sharing to incredible point. The only thing you need to do is to install it and to start it. Then you need to do the same on the other computer and that is it! You can manipulate with other computer however you want. I personally tried it and it is just fantastic.
If you check Teamviewer references you will see all their clients and that is incredible. If you need simple and instantaneous solution for desktop sharing this is a great thing.
My rate: * * * * *
Program purpose: Desktop sharing
Download: Teamviewer
Hello Ubuntu and Kubuntu people :)
In this tutorial i will show you how to install and set up your VirtualBox in Ubuntu or Kubuntu.
 As you probably know VirtualBox is a program which allows you to install additional OS on your existing one. Lets say that you have Ubuntu and you want to have Kubuntu but you do not want to have dual boot or multi boot and also you do not want to start your Kubuntu from a Live CD all the time. VirtualBox is a great tool to have OS for testing and also it is an easiest Virtual OS manager. It is highly customer friendly and like that very easy to use.
I need to mention that like your virtual OS you can install also Windows so you can use some programs you are missing on Ubuntu/Kubuntu but i will not recommend to use it for gaming because it is very CPU consuming.
Lets begin.
Step 1.
Like always we can install VirtualBox from Terminal/Konsole or with some GUI package manager.
If you are using command line then type:
sudo apt-get install virtualbox-ose
Input your password and hit enter. The installation will start immediately.

If you do not want to type then go to Synaptic/Ubuntu Software Center/Adept/KPackageKit or something fifth and simply type Virtualbox, check it and press install and there you are.
Step 2.
Start your VirtualBox. Go to your programs and find it.

Step 3.
Now we need to create our virtual machine and it's characteristics. Just imagine that you are assembling your new PC configuration :)
Click New button.

As you can see we have started our own Virtual Machine Wizard! He will guide us safely to the end of this process! In this moment i want to tell you that you can NOT create any problem on your OS with this procedure, at least it never happened to me :)
Step 4.
Hit next and you will see following window.

Name your new machine how you prefer. I put Testing OS. Then choose your Operating System. You will see that in the dropping menu there are Linux, Windows, FreeBSD, Solaris and some other OS. In this tutorial i'll pick Linux but you can pick whatever you need to install. After this pick Linux distribution and in this case i picked Ubuntu 32bit version. There are others as well.


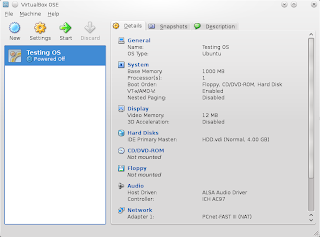
Step 8.
In the display tab we will give our virtual graphic card a little bit more power.

I read that it is enough if you give your virtual graphic card just 16MB but since i have 256MB graphic card it is not a problem to put some more power so i will put 32MB. You can put here whatever you like but try not to make it under 16Mb. Also notice that if you put to much power you can experience your real OS slowdown.
Go to CD/DVD-ROM tab

Step 9.
In CD/DVD-ROM tab you will have to add your .iso image Ubuntu CD so we can use it later.

In the case that you have previously burnt you image file on CD/DVD and you want to start Live CD from that place you can check first option "Host CD/DVD drive".
Click OK.
Step 10.
And that is it. All we need to do now is to click START button. After that you may install your first virtual OS.
It is important to say that VirtualBox works great on Windows, Linux, Solaris and some other platforms. In the case that you are using Windows and you want to try Ubuntu or some other Linux you can also use this tutorial.
If you want to learn how to install Ubuntu click here.
If you want to learn how to install Kubuntu click here.
I hope you will find this tutorial useful. If you like it please rate it and leave a comment.
Thank you and enjoy,

In this tutorial i will show you how to install and set up your VirtualBox in Ubuntu or Kubuntu.

I need to mention that like your virtual OS you can install also Windows so you can use some programs you are missing on Ubuntu/Kubuntu but i will not recommend to use it for gaming because it is very CPU consuming.
Lets begin.
Step 1.
Like always we can install VirtualBox from Terminal/Konsole or with some GUI package manager.
If you are using command line then type:
sudo apt-get install virtualbox-ose
Input your password and hit enter. The installation will start immediately.

If you do not want to type then go to Synaptic/Ubuntu Software Center/Adept/KPackageKit or something fifth and simply type Virtualbox, check it and press install and there you are.
Step 2.
Start your VirtualBox. Go to your programs and find it.

Step 3.
Now we need to create our virtual machine and it's characteristics. Just imagine that you are assembling your new PC configuration :)
Click New button.

As you can see we have started our own Virtual Machine Wizard! He will guide us safely to the end of this process! In this moment i want to tell you that you can NOT create any problem on your OS with this procedure, at least it never happened to me :)
Step 4.
Hit next and you will see following window.

Name your new machine how you prefer. I put Testing OS. Then choose your Operating System. You will see that in the dropping menu there are Linux, Windows, FreeBSD, Solaris and some other OS. In this tutorial i'll pick Linux but you can pick whatever you need to install. After this pick Linux distribution and in this case i picked Ubuntu 32bit version. There are others as well.

Click next.
Step 5.
Now we have to add some RAM memory to our Virtual machine (VM). I have 4GB of RAM and it is not a problem for me to "give" 1GB to my VM. Be careful with this because you must have on your mind that your real OS also needs some RAM memory. In the case that you do not have SWAP memory try not to share to much because you might crush your system. You see that minimum is about 384 but i say give at least 512MB just in case.

When you finish with this hit Next.
Step 6.
OK. We are doing great so far. Now we need to create our Virtual Hard Disc Drive (HDD). For this we also have wizard.

Hit Next and we can start.
You have two options - Dynamic Expanding Storage and Fixed-size storage. The first will adjust to your space demands and in the case of the second one, like the name says, you will have to predefine space on your virtual HDD.

Hit Next.
Now we need to determine our virtual HDD capacity and to place it somewhere on our real HDD. Click little folder icon.

Give some name to your HDD. I gave mine HDD name HDD :)

Click Save. In size section i put 4GB but i think that you can put 2GB. In any case we put dynamic partitioning so if it's necessary it will expand.

Click Next.
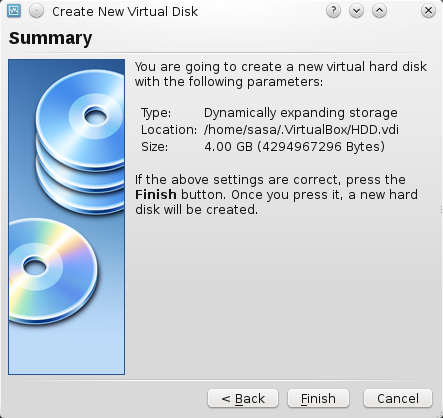
Click Finish. Now we have made basic setup for our VM!
Step 7.
As you can see we have generally created our VM! It was simple so far and it will stay like that. We still need to make some minor adjustments.
Click Settings button on the top of the screen.

You will see following screen. In the settings you can manage your VM in details but for now we will modify just two more thing. One is CD/DVD and other one is virtual graphic card.

Go to Display tab.
Step 8.
In the display tab we will give our virtual graphic card a little bit more power.

I read that it is enough if you give your virtual graphic card just 16MB but since i have 256MB graphic card it is not a problem to put some more power so i will put 32MB. You can put here whatever you like but try not to make it under 16Mb. Also notice that if you put to much power you can experience your real OS slowdown.
Go to CD/DVD-ROM tab

Step 9.
In CD/DVD-ROM tab you will have to add your .iso image Ubuntu CD so we can use it later.

In the case that you have previously burnt you image file on CD/DVD and you want to start Live CD from that place you can check first option "Host CD/DVD drive".
Click OK.
Step 10.
And that is it. All we need to do now is to click START button. After that you may install your first virtual OS.
It is important to say that VirtualBox works great on Windows, Linux, Solaris and some other platforms. In the case that you are using Windows and you want to try Ubuntu or some other Linux you can also use this tutorial.
If you want to learn how to install Ubuntu click here.
If you want to learn how to install Kubuntu click here.
I hope you will find this tutorial useful. If you like it please rate it and leave a comment.
Thank you and enjoy,


Recent Comments